First Person Controls in react-three environment using react-three/rapier physics engine

I am a student, a developer, a tech enthusiasts with some unconventional ideas...
Introduction
Recently, I needed to implement this first person controls feature in a 3D web app. Off course, it was the demand of UX designers and I simply couldn't say 'no', actually in fact, I didn't want to say no to them out of my ego 😤.
Now for this, I would obviously need some reference to at least start with, unless I'm some kind of coding genius. I spent so much of time on the web in search of any documentation, any resource, someone might have put up as a blog post or a video tutorial, in which they have demonstrated the implementation of first person controls in react-three/fiber. I will list down all the other resources you can refer to, for this, at the end of this blog. But, the video by Three.js guru Simon Dev, yeah that's what he calls himself. Anyways, he has demonstrated in a Youtube video a very professional way of implementing First Person Controls in raw three.js. This one could be, most probably, the best resource to refer out there.
In this blog, I will specifically demonstrate on how can you do the same in React using react-three-fiber, off course this uses three.js underneath. Also we'll be using react-three/drei, a helper library for react-three-fiber projects, and last, but not the least react-three/rapier, a physics library supported for react environment, built over the original Rapier Physics Engine written in my favorite programming language Rust. Do I really love it? 🙄 Yeah, I think I do.
I would just like to mention that, writing your own 3D environment yourself with all of its reality (physics) in your control just feels amazing. It might sound like an over exaggeration but, it feels like a God 🙏🏻, of that world, although it's virtual.
Relevant topics (prerequisites)
Three.js:
Three.js is a JavaScript library used for creating and displaying 3D computer graphics in a web browser. It provides tools to make it easier to work with WebGL, a technology that allows browsers to render 3D graphics. Three.js simplifies tasks like creating 3D models, adding textures and lighting, and animating objects, making it more accessible for developers to create interactive 3D experiences on the web.
react-three-fiber:
React Three Fiber is a library that lets you use React to create 3D graphics and visual effects for the web. It makes it easier to work with Three.js, a popular 3D library, by providing a React-friendly way to create and manage 3D scenes and objects.
Yes, this blog does assume you have some basic knowledge of 3D computer graphics and react-three-fiber😅. Essential would be the knowledge of meshes, materials, different types of cameras, controls, colliders and the most fundamental, Canvas, that's all, this is all you need, to understand this blog. To implement your own scene would off course need some more knowledge of lightings, environment mapping, and shading etc. but that's the later part.
Okay, assuming you're equipped with the required knowledge, let's get started.
Setting up the project
You can setup a react project however you prefer using Vite or you can directly setup a Next.js project. I'll just put the commands to create both of these react apps, this thing totally depends on your own requirement and choice anyways, which one will you choose.
npm create vite@latest  //for Vite app

npx create-next-app@latest  //for next app
Once again I want to highlight that the following blog content is relevant irrespective of any tech you use. Yeah, Next.js does trouble at some points, while doing some more advanced implementations, which are out of the scope for this blog.
Now, we will need to install some dependencies, lets install all those with a single command.
npm install three @types/three @react-three/fiber @react-three/drei @react-three/rapier
Hit Enter after this command, this will install Three.js library along with all three libraries mentioned before viz.- react-three-fiber, react-three/drei, and react-three/rapier. It also installs types for Three.js components, incase you are using TypeScript.
Creating a basic scene for self satisfaction 😋
Everybody knows how to create a basic scene, right? In your blank app, create a new file, you may call it Scene.jsx or Experience.jsx anything, again totally depends on you. In that file, start with a Canvas component from react-three-fiber. Style it to occupy entire screen of the device, add some ambient and directional lights. Add a box geometry or simply a Box component from react-three/drei and we are good to go.
Run your app and see the results.
//Scene.jsx

import { OrbitControls } from "@react-three/drei";
import { Canvas } from "@react-three/fiber";

export default function Scene(){
    return (
        <Canvas>

            <OrbitControls />  {/* Add Orbitcontrols */}
            <ambientLight intensity={0.5} />
            <directionalLight position={[5, 5, 5]} />
            <mesh>
                <boxGeometry />
                <meshStandardMaterial color="hotpink" />
            </mesh>
        </Canvas>
    )
}
Notice that, I have added Orbitcontrols component from drei, (from now on I will be referring to react-three-fiber as fiber, react-three/drei as drei and react-three/rapier as rapier or rapier-engine) to the scene, adding it enables you to move entire scene with the help of your mouse, moving entire scene means everything even the lights. This proves helpful in debugging, as it enables you to look at the scenes from different angle and different zoom level.
Your scene should look something like this, depends upon how you style it.

Now, remove this Box, we don't really need it in the scene, and add a planeGeometry instead of boxGeometry inside the <mesh> wrapper, and position it a little lower on the y-axis, and orient it to be horizontal, facing vertically upwards. This would be a base or ground of our scene. The player will move on this ground. Also add a 500 x 500<gridHelper /> component with same position as our ground.
//Scene.jsx

import { OrbitControls } from "@react-three/drei";
import { Canvas } from "@react-three/fiber";

export default function Scene(){
    return (
        <Canvas>

            <OrbitControls />  {/* Add Orbitcontrols */}
            <ambientLight intensity={0.5} />
            <directionalLight position={[5, 5, 5]} />

            {/* Add gridHelper */}
            <gridHelper args={[500, 500]} position={[0, -3, 0]} />

            <mesh position={[0, -3, 0]} rotation={[-Math.PI/2, 0, 0]}>
                <planeGeometry />
                <meshStandardMaterial color="grey" />
            </mesh>
        </Canvas>
    )
}
It's very trivial for any programmer that, moving a player would need some external hardware event, like keyboard hit on the desktop or touch on the touch screen smart phone. I will show you how to do it for a keyboard, you can modify the same code to create UI buttons to show on mobile screen and use screen touch events to control the player.
Keyboard controls
To handle the keyboard events, drei provides a ready made component KeyboardControls. What this component does is, it distributes your data-model, i.e. the keys of the keyboard you want to use, to the useKeyboardControls hook. You can then use this hook to call the data-model anywhere in the child components of the <KeyboardControls /> component. I will show you in the code.
First of all, wrap your entire Canvas scene inside the KeyboardControls component, as shown below. Also notice that, I have imported a new custom component <Player position={[0, 0, 0]} /> in the file.
// Scene.jsx

import { KeyboardControls, OrbitControls } from "@react-three/drei";
import { Canvas } from "@react-three/fiber";
import { useMemo } from "react";
import Player from "./Player";

export default function Scene() {
  return (
    <KeyboardControls   {/*This is the component we are talking about*/}
        map= {useMemo(() =>[
            { name: 'forward', keys: ['W', 'w', 'ArrowUP'] },
            { name: 'backward', keys: ['S', 's', 'ArrowDown'] },
            { name: 'left', keys: ['A', 'a', 'ArrowLeft'] },
            { name: 'right', keys: ['D', 'd', 'ArrowRight'] },
            { name: 'up', keys: ['Space'] },
        ], [])}
    >
      <Canvas>
        <OrbitControls /> {/* Add this line */}
        <ambientLight intensity={0.5} />
        <directionalLight position={[5, 5, 5]} />

        <Player position={[0,0,0]} />

        <mesh position={[0, -1, 0]}>
          <planeGeometry args={[500, 500]} rotateX={Math.PI / 2} />
          <meshStandardMaterial color="hotpink" />
        </mesh>
      </Canvas>
    </KeyboardControls>
  );
}
KeyboardControls has a prop called map, in which we give the relation between the keyboard keys and the events we want to trigger. We can use useMemo hook for this. A useMemo hook is used to memorize the data, which is computationally quite expensive, here you may or may not use useMemo hook, because here is just an array of maps, but in some cases it is very good practice to use this hook. This hook updates the data or a function which is passed to it as a first argument only when the data values mentioned in the dependency array change. Something similar to useEffect.
Read more about useMemo in the official react doc. I will waste too many words in explaining it. 😅
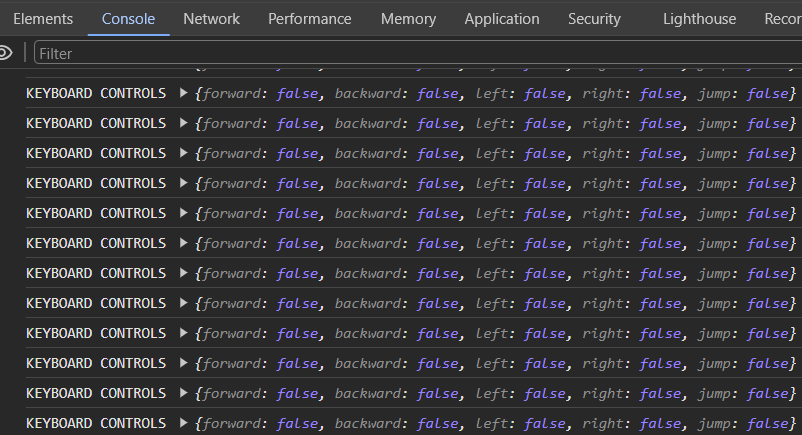
Now, if you notice in the above code, I have imported the <Player /> component. I have called useKeyboardControls hook in this component. This hook returns an array of size two. First element is a subscribe function which can be used to unsubscribe the data-model. Second element is get() function, which fetches fresh states of your data-model non-reactively. If you want to really know what get() function actually does, just console log the return value of get() function and press w,a,s,d buttons or arrow buttons, as I have done in the following code.
//Player.jsx

import { useKeyboardControls } from "@react-three/drei";
import { useFrame } from "@react-three/fiber";

export default function Player({position}) {

    const [_, get] = useKeyboardControls();

    useFrame(() => {
        console.log("KEYBOARD CONTROLS: ", get());
    })

    return (
        <mesh position={position} />
    )
}
You should see something like this in your browser console.
Now, if you don't know useFrame in fiber is a hook, it's in very simple words a loop, that renders each updated frame of a scene in a sequence. It is useful for animations, interactions, or any other logic that needs to be executed continuously while the component is mounted.
Lets code some Physics now
To use the rapier physics library, wrap your entire scene inside a <Physics /> component coming from react-three/rapier library. The <Physics></Physics> wrapper should come after <Canvas></Canvas> wrapper. This will enable you to use all the features of rapier in the children components. So now, your Scene.jsx file will look something like this...
//Scene.jsx
import { KeyboardControls, OrbitControls } from "@react-three/drei";
import { Canvas } from "@react-three/fiber";
import { useMemo } from "react";
import Player from "./Player";
import { Physics, RigidBody } from "@react-three/rapier";

export default function Scene() {
  return (
    <KeyboardControls
      map={useMemo(
        () => [
          { name: "forward", keys: ["W", "w", "ArrowUP"] },
          { name: "backward", keys: ["S", "s", "ArrowDown"] },
          { name: "left", keys: ["A", "a", "ArrowLeft"] },
          { name: "right", keys: ["D", "d", "ArrowRight"] },
          { name: "up", keys: ["Space"] },
        ], []
      )}
    >
      <Canvas>
        <Physics debug> {/* Wrapping the scene with Physics */}
          <OrbitControls />
          <ambientLight intensity={0.5} />
          <directionalLight position={[5, 5, 5]} />
          <Player />

          <RigidBody type="fixed" > {/* Wrapping the mesh with RigidBody component*/}
            <mesh position={[0, -1, 0]}>
              <planeGeometry args={[500, 500]} rotateX={Math.PI / 2} />
              <meshStandardMaterial color="hotpink" />
            </mesh>
          </RigidBody>

        </Physics>  {/* Wrapping the scene with Physics */}
      </Canvas>
    </KeyboardControls>
  );
}
Also notice that, I have wrapped the Plane mesh component by <RigidBody></RigidBody> component, and have set its prop type = 'fixed'. This plane is the ground for our scene, right? When you wrap your scene inside <Physics></Physics> wrapper, all the Rigid Bodies get affected by the gravity. Setting type to fixed disables the gravity on that Rigid Body. This will prevent the Plane mesh from falling down. Thus, our bare minimum ground is ready. 🥳🥳😑 Anyways...
Finally lets Program our "Player" 😤
Collider as a Player
First and foremost, our bare minimum player will be a collider, a Capsule collider to be specific. See, I know that a player should be a human or some creature. You can afterwards replace this collider with the 3D model of an avatar, or can mask the collider with that 3D model. This is just a raw demo.
Now imagine, what a capsule looks like, 💊 standing straight. It touches a ground at a single point, if that makes sense to your brain. So, it becomes pretty easy for it to move on the ground without getting much affected by the terrain of the ground.
I forgot to mention that rigid bodies collide, yeah, I mean it's obvious, right? So, in our scene, that plane (ground) is a rigid body and this player too is a rigid body, when the player is on the plane due to the normal force it doesn't fall down. Without rapier, meshes do pass through each other. We will set the type of this Player rigid body to dynamic because, we want it to move and not to be fixed at a particular location. There are more two types of Rigid bodies. You can read about them in the official documentation of rapier.rs.
NOTE: Don't forget to wrap <RigidBody ></RigidBody> wrapper inside <group></group>. Rigidbody should not be the outermost component for a file.
// Player.jsx
import { useKeyboardControls } from "@react-three/drei";
import { useFrame } from "@react-three/fiber";
import { useRef } from "react";

export default function Player() {

  const controls = useRef();

  const [_, get] = useKeyboardControls();

  useFrame(() => {
    console.log("KEYBOARD CONTROLS: ", get());
  });

  return (
    <group>
      <RigidBody
        type="dynamic"
        ref={controls}
        mass={5}
        position={position}
        restitution={0.3}
        colliders={false}
        enabledRotations={[false, false, false]}
        canSleep={false}
      >
        <CapsuleCollider args={[1.25, 0.5]} />
      </RigidBody>
    </group>
  );
}
You can see in the above code, I have given other props and values to the Player rigid body. You can easily understand what is mass and position.
restitution:
restitutiondefines the bounciness of the body.colliders: Now, a rigid body, consisting of a mesh inside it, needs to assume the shape of that mesh. Read more about it here. We have set
collidersproperty to false because we already are wrapping a collider and not a mesh inside<RigidBody></RigidBody>. Notice<CapsuseCollider />component here, it has a propargs={[1.25, 0.5]}, here, 1.25 is the height of the capsule and 0.5 is the radius of cross section.enabledRotations:
enabledRotationsis set to[false, false, false], this means that, the body is not allowed to rotate about any axis (X, Y or Z). This ensures that a body stands straight and doesn't fall down.canSleep:
canSleepis set to false because, in rapier the rigid body gets deactivated (sleeps) when not acted upon for some period. SettingcanSleepto false prevents the body from sleeping and the body always stays active.ref: I have also used a reference which I called
controlsusinguseRefhook from react, to refer to this rigid body, so I can perform operations on it to control it.
Moving on a Ground in 2-dimensions
I am defining 3 variables, all are vectors outside the scope of Player function, this is not compulsory actually, you can define those even inside the scope of the function it won't affect the results. These vectors are a frontVector which will control the forward-backward movement of the player, then a sideVector which will control the left-right movement and a directionVector which will control the direction.
const frontVector = new THREE.Vector3();
const sideVector = new THREE.Vector3();
const directionVector = new THREE.Vector3();
Next, we use the useFrame hook, which is actually a home of react-three-developers. 🙄 I hope this doesn't sound complete nonsense. I got out of my vocabulary to describe it. Anyways...
In useFrame, first thing I did was create a constant that will store the current state of the Player. I called it conCurr a very weird and stupid name, I know. The second thing I did was positioning the scene camera (A Perspective camera, which you get by default) to the position of this rigid body, which we would be controlling. That's what our main goal is, remember? All we got to do now is control this rigid body.
useFrame((state, delta) => {

    const conCurr = controls.current;

    state.camera.position.set(
        conCurr?.translation().x,
        conCurr?.translation().y,
        conCurr?.translation().z
      );
}
PointerLockControls to control Player's Direction
Actually, one thing is left to be done. In the Scene.jsx file, add <PointerLockControls/> component from drei. Adding this component moves the camera target (the point where the camera looks at) with the mouse. That's how every first person or even third person controls work, right? We change our direction in the scene using the mouse. So, the final Scene.jsx looks something like this. (Find the comments for spotting changes)
import { KeyboardControls, OrbitControls, PointerLockControls } from "@react-three/drei";
import { Canvas } from "@react-three/fiber";
import { useMemo } from "react";
import Player from "./Player";
import { Physics, RigidBody } from "@react-three/rapier";

export default function Scene() {
  return (
    <KeyboardControls
      map={useMemo(
        () => [
          { name: "forward", keys: ["W", "w", "ArrowUP"] },
          { name: "backward", keys: ["S", "s", "ArrowDown"] },
          { name: "left", keys: ["A", "a", "ArrowLeft"] },
          { name: "right", keys: ["D", "d", "ArrowRight"] },
          { name: "up", keys: ["Space"] },
        ],
        []
      )}
    >
      <Canvas>
        <Physics debug>
          {/* <OrbitControls /> */}
          <PointerLockControls /> {/*remove OrbitControls and add PointerLockControls */}
          <ambientLight intensity={0.5} />
          <directionalLight position={[5, 5, 5]} />
          <Player />

          <RigidBody type="fixed" >
            <mesh position={[0, -1, 0]} rotate={[-Math.PI/2, 0, 0]}>
              <planeGeometry args={[500, 500]} />
              <meshStandardMaterial color="hotpink" />
            </mesh>
          </RigidBody>

        </Physics>
      </Canvas>
    </KeyboardControls>
  );
}
Coming back to locomotion on Ground
Coming back to Player.jsx file. We haven't yet wrote a logic to move the Player using w, a, s, d or arrow keys. It's simple, we are reading the keyboard events using useKeyboardControls hook, from where we got our get() function which we console logged. We will now use that, if you actually consoled logged the return value of get() function and tried pressing these w, a, s, d keys, you realize that, when w is pressed, forward is set to true, when s is pressed, backward value is set to true, and similarly left and right values are set to true when a and d are pressed respectively, also when space is pressed jump becomes true. We will use these same forward, backward, left, right and jump values by de-structuring those from get() function.
useFrame((state, delta) => {

    const conCurr = controls.current;

    const { forward, backward, left, right, jump } = get();

    state.camera.position.set(
        conCurr?.translation().x,
        conCurr?.translation().y,
        conCurr?.translation().z
      );
}
Now, notice how we use these values to set the frontVector and sideVector.
useFrame((state, delta) => {

    const conCurr = controls.current;

    const { forward, backward, left, right, jump } = get();

    state.camera.position.set(
        conCurr?.translation().x,
        conCurr?.translation().y,
        conCurr?.translation().z
      );

    frontVector.set(0, 0, backward-forward);
    sideVector.set(right-left, 0, 0);
}
The z-component of frontVector is set to backward-forward, while x, y components are set to 0, which means, this vector will only change a position of the Player along z-axis, more specifically, local z-axis. Local axes for the Player are axes w.r.t the Player, where the origin will be at the center of mass of the body, and the rotation of the rigid body will result in the rotation of the local axes with it. Keep in mind that, because of this, camera is always looking towards negative local z-axis, and this is the key.
The value of backward-forward will be -1 when forward is true and backward is false and 1 when backward is true and forward is false. You know true means 1 and false means 0, don't you? What all of this means is, when forward will be true the z-component of the vector will be set to -1, by which we tell the Player to move forward as it always is facing towards negative local z-axis and this will be exact opposite when backward is true.
Now, for the sideVector it's quite opposite. The x-component of sideVector is set to left-right, which is quite opposite than what we would expect by our intuition, looking at frontVector. I mean, if left is true the value of left-right will be 1 which means in the positive x-axis, but we know that positive x-axis points towards right direction and not the left direction. Yeah, it's intentionally opposite. You'll know why soon.
 directionVector
        .subVectors(frontVector, sideVector)
        .normalize()
        .multiplyScalar(4)
        .applyEuler(state.camera.rotation);
Look at the code above. The directionVector we defined in the beginning of this code, we are dealing with it in this above code block. Lets see all the operations one-by-one.
subVectors(frontVector, sideVector): This method performs the vector subtraction of asideVectorfrom afrontVector. Let me explain this😮💨, the result fromfrontVectoris gonna be unaffected whensideVectoris (0, 0, 0) (i.e. none of keyaanddare pressed on the keyboard) that means, whenworsare pressed we can expect our Player to move forward and backward as always expected. WhenfrontVectoris (0, 0, 0) the result of this subtraction is negativesideVector, yeah yeah you got that, right? Why we setsideVectorasleft-rightand notright-left, that's because we are finally subtracting it here and its direction changes. Cool, isn't it? So now, if it makes sense, whenais pressed the Player will move in the left direction and pressingdwill move it in the right direction.Now, Lets talk about when both
frontVectorandsideVectorare not (0, 0, 0).Consider a case:
frontVector= (0, 0, -1) [wis pressed]and
rightVector= (1, 0, 0) [ais pressed]frontVector-sideVector= (-1, 0, -1)This direction comes exactly between -ve x-axis and -ve z-axis.
Looking at the top view of the Player it is easy to understand its relative directions.
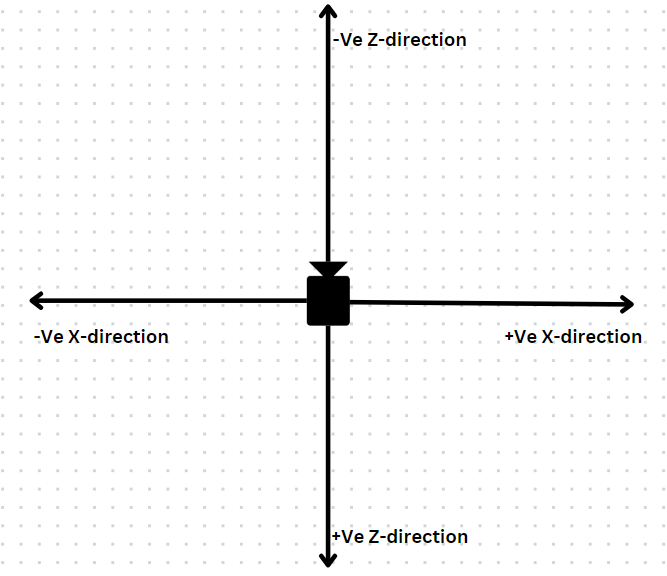
You can easily see from this diagram, what will be the resulting direction between -ve z-direction and -ve x-direction. Just let you brain work.
Similarly, you can have different directions for different values of
frontVectorandsideVector.normalize(): It simply normalizes the result of subtracted vectors. Which means irrespective of the direction of the resultant vector, this method will make sure the magnitude always remain 1.multiplyScalar(4): Now we multiply this normalized magnitude by 4. You can have any value other than 4, this will adjust the speed of movement of the Player.applyEuler(state.camera.rotation): This is what Three.js doc says aboutapplyEuler()method 😑: Applies, Euler transform to this vector (directionVectorin this case) by converting the Euler object to a Quaternion and applying.Ok, ignore it if you didn't get any thing, because you don't probably know what a Quaternion 😵💫 is. What it actually means is, the direction vector is transformed according to the rotation of the camera of the scene, which is passed as an argument to
applyEuler()method. This camera rotation is controlled by<PointerLockControls />, remember? So, overalldirectionVector'sdirection is controlled by the scene's camera.
I've explained all the operations in a very detailed way that, anyone can understand them. This directionVector is a final effective vector for locomotion on the ground, in x-z plane.
Let's move further.
const velocity = conCurr?.linvel();

conCurr?.setLinvel({
        x: directionVector.x,
        y: velocity.y,
        z: directionVector.z,
      });
In the above code, we are storing the current *(latest)*velocity of the Player in a velocity constant. We are setting the current linear velocity of the reference controls to the object passed in the setLinvel() method (refer the code) .
NOTE:setLinvel()accepts a JavaScript Object as an argument, not an array and not 3 separate arguments as x, y and z. I wasted a lot of time hitting errors because I was putting this argument in a wrong way 🙄.
The velocity constant here keeps the track of Player's current velocity at every instant of the time. The velocity of a Player in the y-direction, i.e. in the vertical direction for the Player, is kept unchanged and is set to current velocity's y-component.
Handling Jump
Until now, I'm sure that you've got familiar with our way, possibly, you can now at least tell a logic to implement jump. Player, when on ground can jump. Yeah, that's it. 😂 Only the thing is, we want to make sure that the Player, should not be able to jump when it's not on the ground, that is when it's in the mid air.
Now, for that we have a way. We get a world instance from useRapier() hook. This world instance has a castray() method. The idea is simple. From the center of the Player body i.e. 'Capsule collider', we will cast a ray of limited length, in the negative y-direction, which is vertically downwards for the Player. When the Player is on the ground and not in the mid air, the ray is intersecting the ground, but when the Player has jumped and now at an instant the Player is in mid air, the ray will not be intersecting with the ground. Thus, we can check with this whether the Player is on ground or not. We store this in a Boolean constant calling it grounded. Refer the following code to understand, what I'm trying to say.
As said earlier we get the word instance from rapier which we define in the function body before return statement, as const rapier = useRapier();. So, indirectly we are getting world instance form useRapier() hook, we store it in a constant called world. Then, we get the ray instance from world by applying castRay() method to it.
The castRay() method actually expects 3 arguments, a RAPIER ray, maxToi of type number and solid of type Boolean. Here, we have not passed second and third arguments. There are some more arguments which castRay() method accepts.
I will tell what these both maxToi and solid arguments are about. So, solid argument defines whether the body, from where the ray is casted, is solid or not. Depending on whether it is solid, Toi is calculated. Toi is time of impact. For solid it starts calculating from the center of mass of the body and for empty bodies, it starts calculating form the surface. maxToi defines the maximum time of impact that can be reported by the ray. In short the length of the ray. Read more about this in this doc. I would insist you to give it a read, this is a very common way for detection of collision in almost all 2D and 3D games.
const world = rapier.world;
const ray = world.castRay(new RAPIER.Ray(conCurr.translation(), {x: 0, y: -1, z: 0}));
const grounded = ray && ray.collider && Math.abs(ray.toi) <= 1.75;

console.log('Grounded', grounded);

if(jump && grounded){
  conCurr.setLinvel({x: velocity.x, y: 5, z: velocity.z});
}
Our Ray object of RAPIER class [new RAPIER.Ray()] too has 2 arguments, an origin and a direction. The first argument is its origin and the second defines its direction. We have set an origin to the current location or translation of the Player and direction in the negative y-direction, which we know is vertically downwards for our Player.
Now we finally check whether the Player is on the ground or not. We do that by checking first whether ray is defined or not, further the value of ray.collider is null when the ray is not colliding with any body and not null when intersecting something, so we check that. Finally we check the time of impact (toi), if its value is less than 1.75 we can say that Player is on ground, otherwise not. This value of maxToi needs to be chosen cleverly, for uneven terrain, setting it to the exact height of the collider can create issues. Issues like flickering between whether body is grounded or not, this can lead to unexpected behavior and we would definitely like to avoid that. So, now we have our grounded Boolean ready.
As you can see in the code it is very intuitive that when the body or Player is on the ground and jump event is triggered (by pressing space key in our case) the Player must jump, otherwise stay on the ground or while in the mid air, just fall down.
Congratulations guys, we have programmed our First Person Controls feature in react-three environment using rapier physics library.
Finally, both the files will look something like this. I have added a <Sky /> component from drei to have a sky environment in the background.
// Scene.jsx

import {
  KeyboardControls,
  OrbitControls,
  PointerLockControls,
  Sky,
} from "@react-three/drei";
import { Canvas } from "@react-three/fiber";
import { Suspense, useMemo } from "react";
import Player from "./Player";
import { Physics, RigidBody } from "@react-three/rapier";

export default function Scene() {
  return (
    <KeyboardControls
      map={useMemo(
        () => [
          { name: "forward", keys: ["W", "w", "ArrowUP"] },
          { name: "backward", keys: ["S", "s", "ArrowDown"] },
          { name: "left", keys: ["A", "a", "ArrowLeft"] },
          { name: "right", keys: ["D", "d", "ArrowRight"] },
          { name: "jump", keys: ["Space"] },
        ],
        []
      )}
    >
      <Canvas
        // camera={{position:[0, 0, 550]}}
      >
        <Suspense>
          <Physics debug>

            <PointerLockControls />
            {/* <OrbitControls /> */}

            <Sky sunPosition={[100, 10, 100]} />
            <gridHelper args={[500, 500]} position={[0, -3, 0]} />
            <ambientLight intensity={0.5} />
            <directionalLight position={[5, 5, 5]} />
            <Suspense>
              <Player position={[0, 0, 0]} />
            </Suspense>
            <Suspense fallback={null}>
              <RigidBody type="fixed" rotation={[-Math.PI/2, 0, Math.PI/2]} position={[0, -3, 0]}>
                <mesh position={[0, -1, 0]} >
                  <planeGeometry args={[500, 500]}  />
                  <meshStandardMaterial color="grey" />
                </mesh>
              </RigidBody>
            </Suspense>
          </Physics>
        </Suspense>
      </Canvas>
    </KeyboardControls>
  );
}
// Player.jsx

import { useKeyboardControls } from "@react-three/drei";
import { useFrame } from "@react-three/fiber";
import { useRef } from "react";
import { CapsuleCollider, RigidBody, useRapier } from "@react-three/rapier";

import * as THREE from "three";
import RAPIER from "@dimforge/rapier3d-compat";

const frontVector = new THREE.Vector3();
const sideVector = new THREE.Vector3();
const directionVector = new THREE.Vector3();

export default function Player({ position }) {
  const controls = useRef();
  const rapier = useRapier();

  const [_, get] = useKeyboardControls();

  useFrame((state, delta) => {
    const conCurr = controls.current;

    const { forward, backward, left, right, jump } = get();

    state.camera.position.set(
      conCurr?.translation().x,
      conCurr?.translation().y,
      conCurr?.translation().z
    );

    frontVector.set(0, 0, backward - forward);
    sideVector.set(left - right, 0, 0);

    directionVector
    .subVectors(frontVector, sideVector)
    .normalize()
    .multiplyScalar(4)
    .applyEuler(state.camera.rotation);

    const velocity = conCurr?.linvel();

    controls.current?.setLinvel({
      x: directionVector.x,
      y: velocityVector.y,
      z: directionVector.z,
    });

    const world = rapier.world;
    const ray = world.castRay(new RAPIER.Ray(conCurr.translation(), {x: 0, y: -1, z: 0}));
    const grounded = ray && ray.collider && Math.abs(ray.toi) <= 1.75;

    console.log('Grounded', grounded);

    if(jump && grounded){
      conCurr.setLinvel({x: velocity.x, y: 5, z: velocity.z});
    }

  });

  return (
    <group>
      <RigidBody
        type="dynamic"
        ref={controls}
        mass={5}
        position={position}
        restitution={0.3}
        colliders={false}
        enabledRotations={[false, false, false]}
        canSleep={false}
      >
        <CapsuleCollider args={[1.25, 0.5]} />
      </RigidBody>
    </group>
  );
}
And we are done! 😮💨
Just some ways to Debug
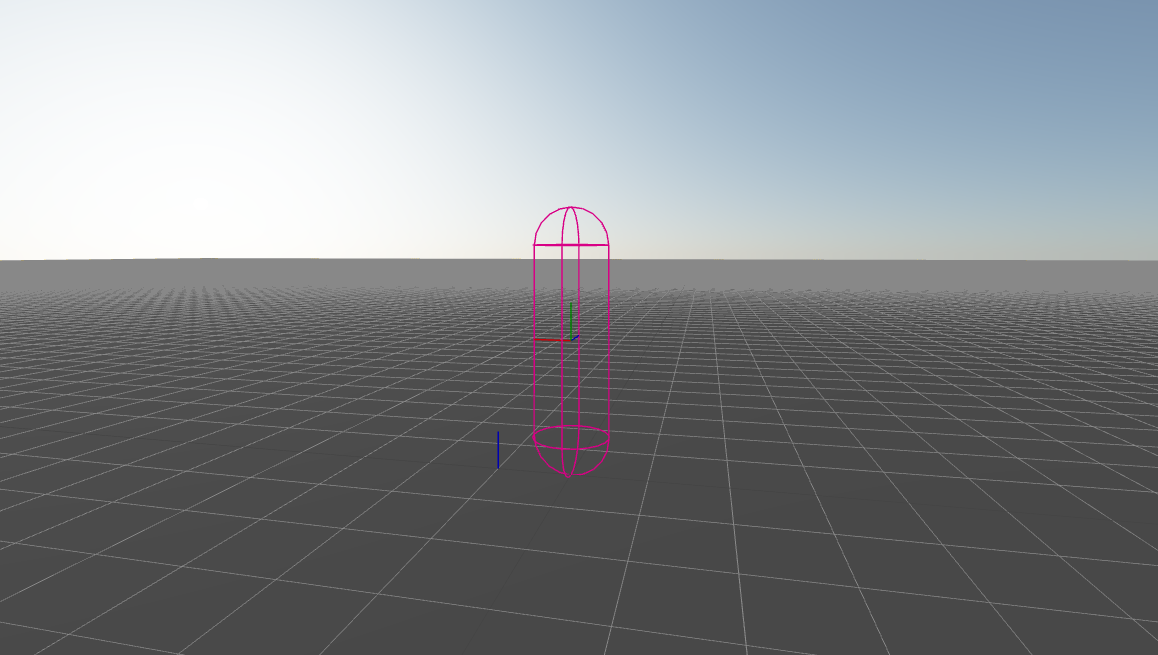
When you set your global state's camera position to the position of the Player, you are unable to inspect the position, orientation and behavior of the Player and PointerLockControls can be very frustrating when the Player's position or orientation is not what we expect. Actually, what we want is, to be able to see this collider.
For this, what you can do is, firstly set debug prop on <Physics > wrapper in the Scene.jsx file.
// Scene.jsx

<Physics debug> {/* Here added debug prop */}
   .
   .
   .
</Physics>
Also set the camera position somewhere away from the global origin to be able to see the Capsule Collider. The Capsule Collider will be at the global origin when page is reloaded, according to our code. You can do this by adding cameraprop to the <Canvas > component. You can definitely adjust other properties like field of viewfov, near and farvision of the camera if you want. I am not doing it here.
Now, just until you are debugging, remove <PointerLockControls /> component and add <OrbitControls />.
Now go to the Player.jsx file...
// Scene.jsx

<Canvas
  camera={{position:[0, 0, 50]}}
>
  {/* <PointerLockControls /> */}
   <OrbitControls />
  .
  .
</Canvas>
In Player.jsx, just remove all the operations that we are performing on global state's camera, again just until you are debugging. Keep rest all other things as they are.
// Player.jsx
    .
    .
    .
export default function Player({ position }) {
  const controls = useRef();
  const rapier = useRapier();

  console.log(controls);

  const [_, get] = useKeyboardControls();

  useFrame((state, delta) => {
    const conCurr = controls.current;
    const { forward, backward, left, right, jump } = get();

    /* state.camera.position.set(
      conCurr?.translation().x,
      conCurr?.translation().y,
      conCurr?.translation().z
    ); */

    frontVector.set(0, 0, backward - forward);
    sideVector.set(left - right, 0, 0);

    direction
    .subVectors(frontVector, sideVector)
    .normalize()
    .multiplyScalar(4)
//    .applyEuler(state.camera.rotation);

    const velocity = conCurr?.linvel();

    controls.current?.setLinvel({
      x: direction.x,
      y: velocity.y,
      z: direction.z,
    });

    .
    .
    .
}
You will be able to see a Capsule moving on the ground and it's a real fun to see. 😁
References
These are the ones I refered, there are more.
Jaa! 👋
See you till the next time! 🙇♂️


